Getting Started
Prerequisites
- Atlassian Jira Cloud instance
- Jira project administrator or site administrator role
Installation
- Go to the Atlassian Marketplace listing
- Click Install and select your Jira site
- The app will appear in your project sidebar as Triage Inbox
Initial Setup
- Navigate to your project in Jira
- Open Project Settings → Apps → Triage Inbox
- Ensure Enabled is toggled on
- Optionally select which issue types require triage (none = all types)
- Configure the Decline Workflow — map each decline reason to a Jira status and resolution
That's it! New issues will now automatically appear in the triage inbox.
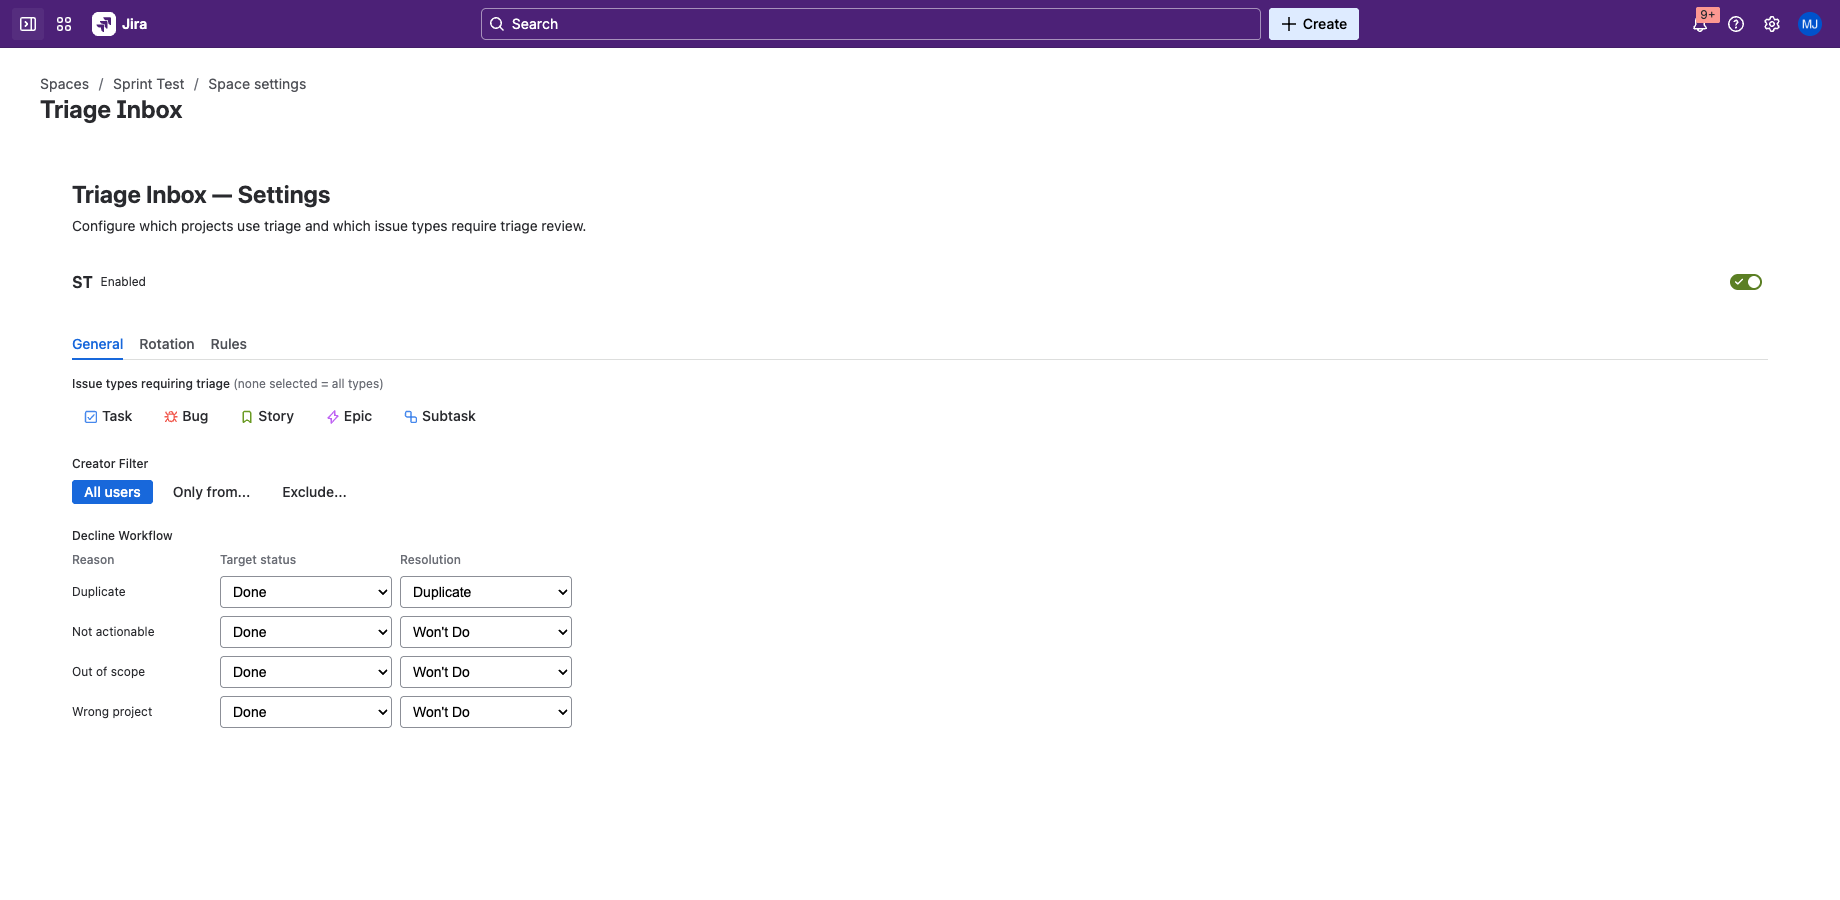
Project Settings — General tab with issue type filters, creator filter, and decline workflow mapping
Triage Actions
| Action | What happens | Jira changes |
|---|---|---|
| Accept | Issue is triaged and stays in current status | Removes "untriaged" label, posts optional comment |
| Decline | Issue is rejected with a reason | Transitions to Done, sets resolution, posts comment |
| Snooze | Issue is hidden until a future date | Removes "untriaged" label, reappears on snooze date |
| Duplicate | Issue is linked to the original | Creates "Duplicate" link, transitions to Done, posts comment |
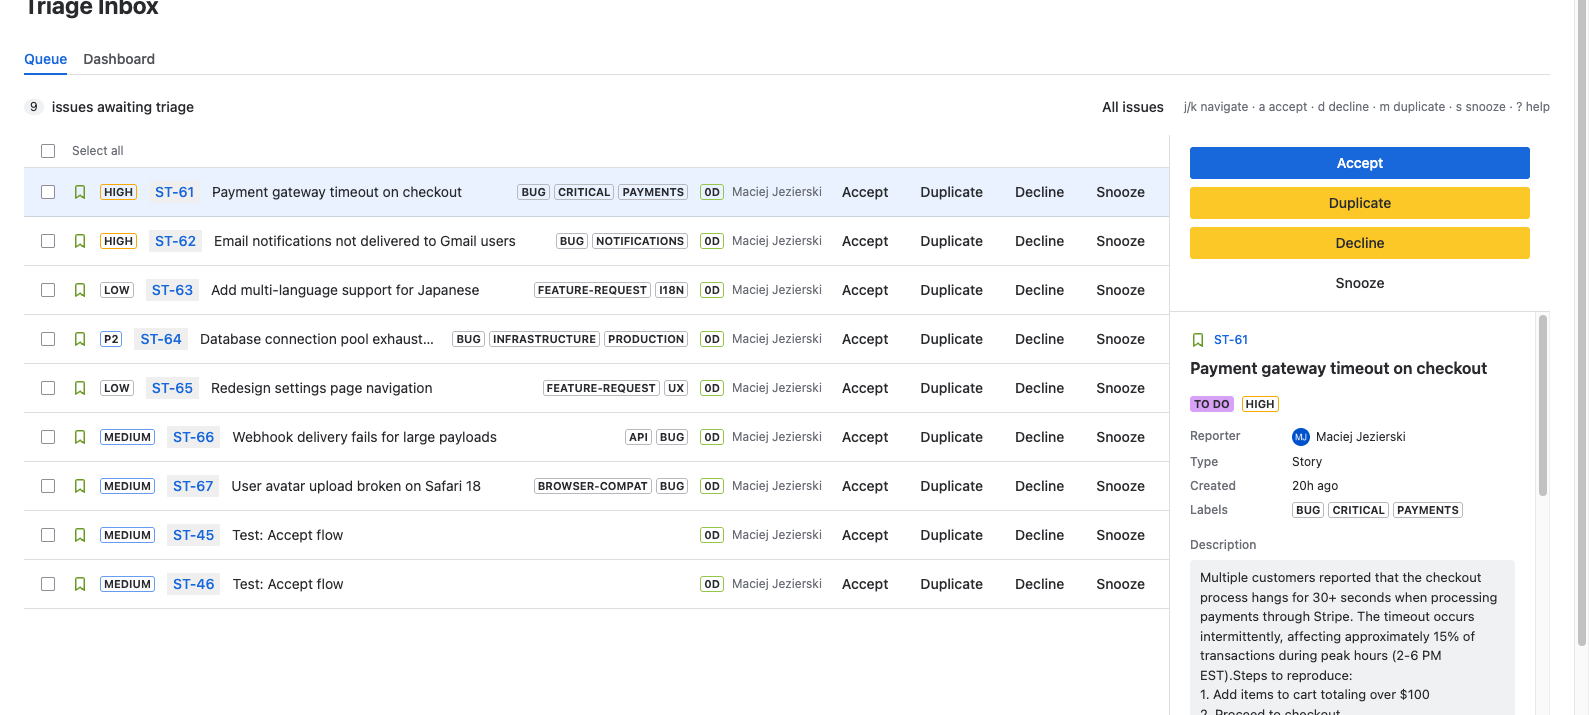
Triage queue with detail sidebar — navigate with j/k to see description, status, labels, and attachment previews
Keyboard Shortcuts
| Key | Action |
|---|---|
j / k | Navigate down / up |
a | Accept selected issue |
d | Decline selected issue |
m | Mark as duplicate |
s | Snooze selected issue |
? | Show shortcuts help |
Rotation Schedule
Set up a triage rotation to distribute responsibility across your team:
- Go to Project Settings → Triage Inbox → Rotation tab
- Choose rotation type (daily or weekly) and length
- Set handoff hour and start date
- Add participants via user search
- Enable auto-assign to automatically assign new triage items to the current on-call responder
The 3-week schedule preview shows who's on call. Use overrides for vacations or ad-hoc changes.
Triage Rules
Automate triage decisions with rules that fire when issues enter the queue:
- Conditions: Priority, Labels, Reporter, Issue Type, Component (with AND/OR logic)
- Actions: Set assignee, Set priority, Add labels, Set triage responder
Rules are evaluated top-to-bottom. Reorder them to control execution priority.
Project Settings
Configure triage behavior per project in the General tab:
- Issue type filters — Select which types require triage (none = all)
- Creator filter — Include or exclude issues by user or Jira group
- Decline workflow — Map each decline reason to a target status and resolution
Decline Workflow
For each decline reason (Duplicate, Not Actionable, Out of Scope, Wrong Project), configure:
- Target status — The "Done" category status to transition to
- Resolution — The Jira resolution to set (e.g., "Won't Do", "Duplicate")
If not configured, the app falls back to smart defaults (first available Done status + resolution name matching).
Creator Filter
Control which issues enter triage based on who created them:
- All users — Every new issue enters triage (default)
- Only from... — Only issues from specific users or groups
- Exclude... — All issues except from specific users or groups
Useful for triaging customer-reported issues while excluding your own team's work.
Permissions
Triage Inbox uses two custom Jira permissions to control access. These permissions appear in your Jira site alongside other global permissions and can be assigned to specific groups.
Manage Triage Inbox
Default: Jira administrators only
Users with this permission can:
- Enable/disable triage for a project
- Configure issue type filters, creator filters, and decline workflow mappings
- Set up and modify rotation schedules (participants, cadence, overrides)
- Create, edit, delete, and reorder triage rules
- Assign permission groups in the Permissions tab
Users without this permission can still view project settings and rotation schedules, but Save buttons are disabled.
Triage Issues
Default: All users
Users with this permission can:
- Accept issues (with optional note)
- Decline issues (with reason selection)
- Snooze issues (preset or custom date)
- Mark issues as duplicate (with issue search)
- Bulk accept or decline selected issues
Users without this permission can still view the triage queue and issue details in the sidebar, but action buttons are hidden and keyboard shortcuts for triage actions are disabled.
How to configure permissions
- Go to Project Settings → Apps → Triage Inbox
- Open the Permissions tab
- For each permission, search for a Jira group and add it
- Click Save
Important: Once you assign groups to a permission, only members of those groups will have it. If no groups are assigned, the default behavior applies (Jira admins for Manage, all users for Triage).
Example configurations
| Scenario | Manage Triage Inbox | Triage Issues |
|---|---|---|
| Default (no configuration needed) | Jira administrators | All users |
| Dedicated triage team | jira-administrators | triage-team |
| Team leads manage, developers triage | team-leads | developers |
| Single project owner | project-admins | project-admins, developers |
Jira scopes used by the app
Triage Inbox requests the following Jira scopes. These are granted at app installation and cannot be changed per-user:
| Scope | Purpose |
|---|---|
| Read issues & work | Populate triage queue, fetch details, attachments, statuses |
| Write issues & work | Transition declined issues, set resolutions, manage labels, create links |
| Run JQL queries | Batch enrichment and duplicate search |
| Read issue details | Description, status, assignee, attachments for the sidebar |
| Read projects | List projects and issue types for settings |
| Read users & groups | Creator filter, rotation participants, permission group checks |
| Report personal data | GDPR compliance — weekly report of stored account IDs |
Data & privacy
All data is stored in Forge SQL (Atlassian-managed infrastructure). No data leaves the Atlassian platform. The app does not use AI, external APIs, or third-party services.
Stored data includes triage state, project settings, rotation schedules, rules, and dashboard snapshots. A weekly GDPR handler reports stored account IDs to Atlassian and automatically anonymizes data when accounts are closed.
Issue Context Panel
The Triage panel appears in every issue's right sidebar. For pending issues, it shows Accept/Decline/Snooze buttons. For triaged issues, it shows the status and triage history.
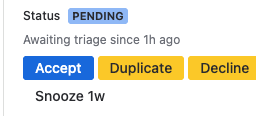
Issue sidebar — Triage Inbox panel with status and action buttons
Support
Need help? Contact us at support@be4.software or visit our support portal.